Automatic License Plate Recognition (ALPR) systems rely on clear, high-contrast images of license plates for high accuracy. Achieving this with ALPR requires properly adjusted camera settings, especially when dealing with challenging lighting conditions such as bright sunlight, low light, glare and shadows. Two critical settings that directly impact the quality of captured images are exposure and post-processing gain. Fine-tuning these settings ensures that the license plate details are sharp and readable, leading to improved recognition rates.
This post, written by our amazing Technical Support, will explore how exposure and gain affect image quality, and best practices for adjusting them to handle different lighting scenarios.
This post will go over the techniques to get the best license plate pictures from Inex technologies cameras.
Understanding Exposure and Gain in LPR Cameras
LPR Camera Exposure
Exposure determines how much light the camera sensor receives. The exposure in our LPR cameras is influenced by two main factors:
1) Shutter Speed – The amount of time the camera sensor is exposed to light. A faster shutter speed reduces motion blur but decreases brightness, while a slower shutter speed increases brightness but may cause blur if the vehicle is moving quickly.
2) Auto Exposure Weight – Controls the sensitivity of the camera sensor to light. The higher this setting the brighter the image but it can introduce noise (graininess) in the image.
LPR Camera Gain
Gain amplifies the signal from the camera sensor to make the image brighter without changing the physical exposure.
1) Higher gain increases the brightness of the image but introduces noise, which can reduce the clarity of the image.
2) Lower gain produces cleaner images but may make the image too dark in low-light conditions.
Challenges with License Plate Recognition in Different Lighting Conditions
LPR cameras must operate effectively in challenging lighting environments, such as:
1) Direct Sunlight – When the sun is directly behind the camera in line with the license plate, the license plate may reflect too much light, leading to overexposure and a washed-out image.
2) Low Light or Nighttime – Poor lighting can make the license plate difficult for a color camera to read, requiring increased sensitivity or the use of an infrared illumination camera.
3) Headlights and Glare – Headlights from oncoming vehicles can create bright spots, making it hard to distinguish plate characters.
4) Shadows and mixed lighting – Rapid transitions between light and shadow, as when a black car moves across light grey driveway, can confuse the camera’s auto exposure settings.
Best Practices for Adjusting Exposure and Gain of License Plate Cameras
1. LPR in Daylight Conditions
In bright sunlight, the goal is to prevent overexposure and glare while maintaining sharp details:
1) Lower Exposure Time – Use a fast shutter speed (e.g., 1/1000s to 1/1500s) to minimize glare and motion blur.
2) Reduce Gain – Keep gain low to minimize noise and maintain clean details.
Example:
- Shutter speed: 1/1500s
- · Gain: Low (20-32)

Example of a car image in a well light condition.
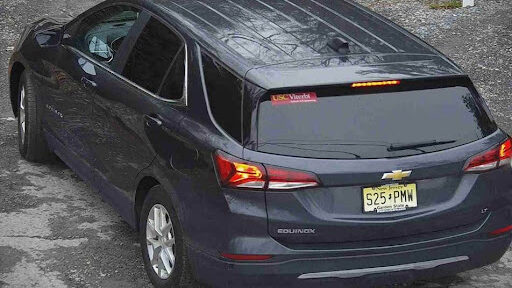
Example of a car image in a well light condition.
2. LPR in Low Light and Nighttime Conditions
At night, the key is to maximize light capture without introducing excessive sensor noise:
1) Slow Down Shutter Speed – Increase exposure time to allow more light in (e.g., 1/500s to 1/1000s).
2) Increase Gain Moderately – Increase gain enough to brighten the image but avoid excessive noise.
3) Use Infrared (IR) Illumination – Most license plates reflect IR light well, improving visibility without relying on ambient lighting.
Example:
- Shutter speed: 1/500s
- Gain: Medium (32)
- · Day & Night Control: Black & White.
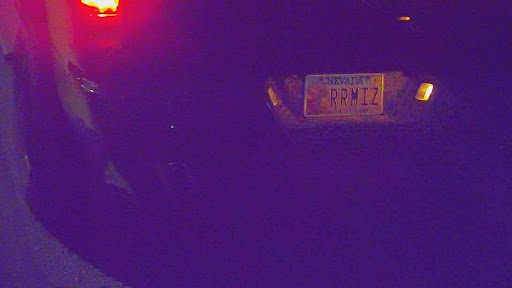
In low light conditions, color camera produces noisy images.
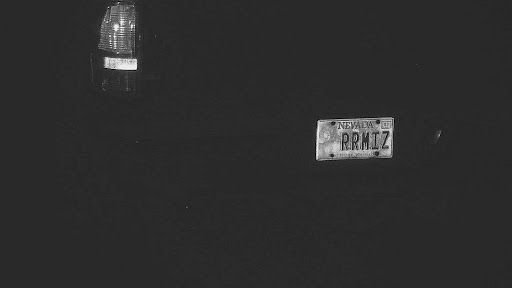
In the same low light conditions, IR camera captures clear images of license plates.
3. Avoiding Headlights and Glare in ALPR
Managing glare from headlights requires a careful balance of exposure and gain:
1) Use 3DNR (Digital Noise Reduction) – This setting allows the camera to capture both bright and dark areas simultaneously.
2) Reduce Shutter Speed – A faster shutter speed helps minimize the effect of bright headlights.
3) Lower Gain – Keep gain low to avoid amplifying the glare.
4) Relay on IR cameras – IR cameras will filter out glare and light from headlights.
Example:
- Shutter speed: 1/1000s
- Gain: Low (20)
- 3DNR: 3
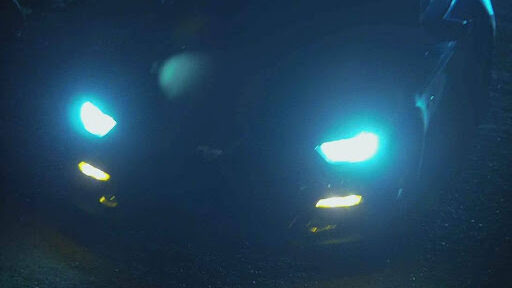
Color camera may get blinded by headlights.
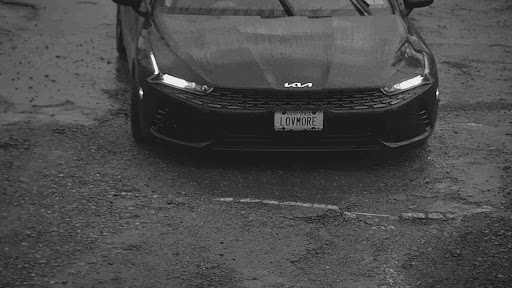
IR camera imaging is generally less susceptible to being blinded by car headlights.
4. Mixed Lighting and Shadows in ALPR
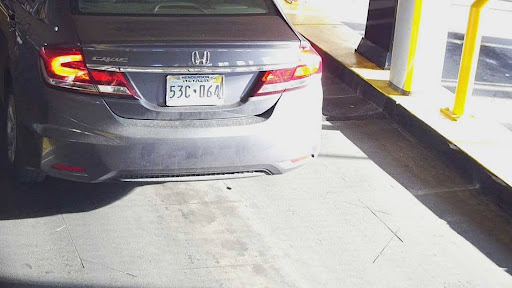
Example of mixed lighting condition.
In areas with alternating bright and dark zones, dynamic adjustments are needed:
1) Manual Shutter Speed – Ensure the shutter speed is set manually keeping the minimum and maximum shutter speed the same.
2) Moderate Gain – Keep gain at a moderate level to maintain detail without increasing noise.
Example:
- Shutter speed: 1/1500s
- Gain: Medium (32)
Additional Tips for ALPR Camera Optimization
1) Avoid a range of shutter speeds in high-contrast environments: Manually setting the minimum and maximum values of the shutter speed prevents the camera from overcompensating.
2) Test at different times of day: Lighting conditions can change significantly throughout the day, so test and adjust settings under varying conditions.
3) Regularly clean camera lenses: Dirt and debris can reduce image clarity and interfere with recognition accuracy.
Fine Tune ALPR Cameras to Read All Plates All the Time
Fine-tuning exposure and gain settings are critical for getting a high performing ALPR system under varying lighting conditions. While daylight scenarios call for fast shutter speeds and low gain to avoid overexposure, low-light and nighttime conditions require slower shutter speeds, wider apertures, and moderate gain to enhance brightness. Advanced features like 3DNR and IR illumination can further improve accuracy and consistency. With proper configuration and calibration, you can ensure that your ALPR system delivers sharp, readable license plate captures regardless of lighting challenges.

